I’m sitting on a train and looking (quite unsubtly I must admit) at a young person sat opposite me with an orange line chiselled down the edge of their face. Now to those of you quite fairly thinking that it is rude to sit and stare at someone’s makeup, you aren’t exactly wrong. However, in my defence, if you were sitting where I am right now, you would most certainly be doing the same. It is not a rare occurrence to see someone with bronzer streaked across their cheeks and under the jaw, and it just never looks good.
Contouring has become a huge part of the beauty industry in the past decade primarily thanks to the Kardashians, but it has been an integral part of makeup for far longer. Not only has it been used by makeup artists long before it was commercially popular, but in fact drag artists have been using it for decades to transform their looks. Now there are endless tutorials on contouring (“How to contour?” brings up about 300 million results on Google) and it seems there are just about that many products advertised for contouring, but it seems that some people still haven’t quite got the hang of it.
So, here are some helpful hints –
Contour helps shape the face
Contour uses shadow to increase the depth and dimension of the cheekbones and jawline. Therefore, warm shades found in bronzers should be substituted for more grey tones to simulate the effect of a shadow falling across the skin. However, the biggest problem with this is that it can easily be as garish as a bright orange stripe across the face. Grey is not a colour readily found in healthy skin, so if applied incorrectly or too heavily, it is as noticeably wrong as using bronzer. Select a shade that seems to simulate shadows as they fall across your skin, and carefully build up the product, constantly moving the face to see how the contour is interacting with light when actually on your face. This will ensure you have a good shade that creates dimension but that does not sallow the skin.

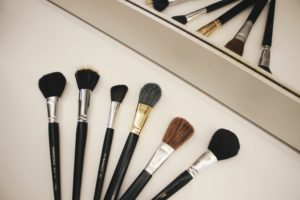
Application is everything!
You can buy the perfect product but if you do not have the right brush to apply it, it’ll still be useless. Fan brushes are a good choice for beginners, as they tend to pick up less product and naturally blend the product. However, it is integral to use the correct size brush, as you do not want drag the product outside of the exact area you want to create the contour. When you are more comfortable with blending, more compact brushes can be used to create more intense contours, if the product is still built up on the skin slowly and placed in the exact place on the skin.
Touch your face
It’s so importany, and often forgotten in my experience, to actually find your cheekbone/jawline, and then find the hollow directly underneath it. Everyone’s face is different, so don’t just follow the tutorial you’re watching, but instead actually feel around for your cheekbone and apply the contour in that hollow. When working on clients, I like to apply the contour in the hollow and built up slightly towards the bottom of the actual cheekbone to really intensify the face shape.
BLEND BLEND BLEND
Finally, for heaven sake, blend. Apply a small amount of product and build it up, constantly blending it to diffuse it into your skin. Use a translucent powder/face powder on the edges of the contour, and try to create a seamless transition from the shadow into the surrounding skin. This will help avoid the horrendous look of lines across the skin, but also help make sure that it really seems as if your skin is falling into a hollow and then rising back over the cheekbone. You want to create shape without harsh colour changes, even if you want a strong contour.
In short – find the right shade, find the right brush, find your cheekbone and then blend blend blend (and just when you think you’re done, blend a little more).
There are nice stock images around for how to contour for your face shape, and so many tutorials, but realistically, it is easier to become accustomed to your own face by trying things and poking about a bit. I learnt to contour through years of trial and error (on myself and others poor things) and you’ll get the hang of it. And though you’ll hear people say you cannot transform your face shape completely, there is some truth to that but equally, have you ever seen a drag queen?
Here are some products that I recommend (which of course cater to ALL skin tones)
Inglot – Freedom System HD Sculpting Powder
Kevyn Aucoin – The Scultping Powder (there are only three shades but they are surprisingly versatile)
Maqpro – Defining Contour Palette (These are quite hard to work with but they are the most natural contour)
Nars -Kabuki Artisan Ita Brush
Rodial – The Fan Brush
Illamasqua – Angled Cheek Brush
“The best colour in the whole world is the one that looks good on you” – Coco Chanel
